local Certificates
Nowadays it is very easy and quick to get a free SSL certificate with Let's Encrypt. Unfortunately, this only applies to public, registered domains. Sadly, this is not a real solution for the home network. That is why I would like to describe / record here how you can implement SSL for your home network.
- What happens with browser queries?
- Requirements / Recommendations
- Create Certificates
- Distribute Certificates
- DNS Resolver
- Gutzi
What happens with browser queries?
DNS names are read by browsers from right to left. e.g.
-
- http://server.example.com -> com - example - server - protocol
Definition of a domain: Top Level Domain (TLD) - Second Level Domain (SLD) - Subdomain (optional) - Protocol
This ensures that a local search is performed first and that a resolution request is only forwarded to a “resolver” if information is not available locally.
In local home networks, this is always solved on each device with the “/etc/hosts” file ( Microsoft: C:\Windows\System32\drivers\etc\hosts ).
With an increased number of devices in the home network, this management becomes inefficient and error-prone over time!
This is why local DNS resolvers (a device that is announced via DHCP or by manual entry on a device) are also used in home networks if required (typical representatives: bind9, dnsmasq, PI-Hole, AdGuard, Technitium and certainly many others). This is where the wheat is separated from the chaff... You have to master the DNS part of the tools and know what you are doing! So far, none of this has anything to do with http:// or https://!
http:// - https:// Resolution
We want to concentrate on SSL = https://! When the browser has processed the above topic, it checks whether a corresponding web server (e.g. apache2, Nginx, others...) provides an accessible page. AND now it gets interesting!!!! The browser uses the certificate stored by the web server to check / query locally whether a trustworthy root certification authority is stored! And this causes the home network with https & domain name to fail! You can find the standard root certification authorities for:
MAC : /Library/Keychains/System.keychain
Linux : /usr/local/share/ca-certificates
Windows : certmgr.msc
But not for the reader, of course! We take this into our hands and realize the concept for a home network!
Requirements / Recommendations
1. Hardware / Operating System
I would recommend buying a Raspberry PI 4 or 5 and running the PI as a 24/7 server in your home network. This will give you the most cost-effective, reliable hardware possible. Operation with LAN (I would not recommend WLAN!) and “ssh” is sufficient. Personally, I would not set up a Windows-based device for this purpose (nor do I describe it)!
2. Software
- currently the Raspberry OS is based on Debian 12 (Bookworm)
- I would recommend the OS Lite 64-bit
- You need "openssl", which is available in the standard PI OS
3. additional Software
Since the SSL implementation is so closely linked to DNS mechanisms, I would also recommend a DNS resolver. Recommendation: Technitium! If PI-Hole & AdGuard fans are now shaking their heads, please watch this video:
4. Decide on an internal domain name
Typically, if you operate an AVM Fritz Box, you can create a "fritz.box" domain. Then the names would be e.g. nas.fritz.box, router.fritz.box, repeater.fritz.box, etc. However, this does not necessarily reflect your home network. It would therefore be better to use a name such as a unique, self-explanatory name, e.g. zuhause,lan or thomas.home.
Please do not use a .local domain, as .local is used by local mDNS services and can lead to "confusion", i.e. unreachability or strange behavior in the network on some devices!
Create Certificates
All subsequent entries, commands, etc. are required in the terminal of the PI OS!
Depending on which instructions you have already read on the Internet, different directories are always suggested or used for storing the certificates. I would suggest that you create a directory that you always use to create and edit your own certificates and specify as the storage location in the browser 'VirtualHost' blocks.
For our example we use:
TLD = lan
SLD = home
subdomain = nas
1. Create a trusted root certification authority
1.1 Create a private key for the root certification authority
command: "openssl genrsa -des3 -out <SLD, ohne TLD>.key 2048"
-
-
e.g. your domain name = zuhause.lan, then only "zuhause"!
-
you will then be asked for a "pass phrase" 8-tung! please assign a password that you will not forget, otherwise massive problems may arise later, as you will need this password from time to time, depending on where and how you want to use your certificate!
-
one more tip:
- The longer the password, the better the encryption. Although I wouldn't overdo it either, as everything only takes place in your home network.
- By the way: if you realize in the course of your work that you want to use a different TLD or SLD, you will have to start all over again. Certificates cannot be changed!
-
1.2 Create the root certificate
-
- command: "openssl req -x509 -new -nodes -key <SLD>.key -sha256 -days 3650 -out >SLD>.pem"
- The following additional information is now requested:
-
Country Name (2 letter code): <>
State or Province Name (full name): <>
Locality Name (eg, city): <>
Organization Name (eg, company): <>
Organizational Unit Name (eg, section): <>
Common Name (e.g. server FQDN or YOUR name): <SLD.TLD>
Email Address: <>
- command: "openssl req -x509 -new -nodes -key <SLD>.key -sha256 -days 3650 -out >SLD>.pem"
<> = you can fill in, but you don't have to!
2. Create certificates based on the root certificate
You must repeat this procedure for each subdomain (mostly devices, e.g. NAS)!
2.1 Create a private key for the certificate
command: "openssl genrsa -out <subdomain.SLD.TLD>.key 2048"
-
-
-
-
- our example = nas.zuhause.lan
-
-
-
2.2 Create a CSR (Code Signing Request)
command: "openssl req -new -key <subdomain.SLD.TLD>.key -out <subdomain.SLD.TLD>.csr"
-
-
-
-
- our example = nas.zuhause.lan
- our example = nas.zuhause.lan
-
-
-
2.3 Create an X509 V3 certificate extension configuration file
command: "nano <subdomain.SLD.TLD>.ext"
authorityKeyIdentifier=keyid,issuer
basicConstraints=CA:FALSE
keyUsage = digitalSignature, nonRepudiation, keyEncipherment, dataEncipherment
subjectAltName = @alt_names

[alt_names]
DNS.1 = <subdomain.SLD.TLD>-
-
-
-
- our example = nas.zuhause.lan
-
-
-
2.4 create the certificate
(with our CSR, the private key of the CA, the CA certificate and the configuration file)
command: "openssl x509 -req -in <subdomain.SLD.TLD>.csr -CA <SLD>.pem -CAkey <SLD>.key -CAcreateserial -out <subdomain.SLD.TLD>.crt -days 3650 -sha256 -extfile <subdomain.SLD.TLD>.ext"
-
-
-
-
- our example = SLD: zuhause - subdomain.sld.TLD: nas.zuhause.lan
-
-
-
hey, you "perseverers...", you actually made it... well, yes - almost! 😇 The root certificate still has to be distributed so that the browsers can successfully validate your certificate and the web server still needs the information about which certificate it should use, but then, I promise, "you'll get along with your neighbor" 😎
Distribute Certificates
1. Root Certificate
The root certificate must be installed on all devices from which you want to access / browse your web server! It is therefore advisable to have your "certificate directory" connected as a drive on the respective devices!
1.1 MAC
command: "sudo security add-trusted-cert -d -r trustRoot -k "/Library/Keychains/System.keychain" <Verzeichnis><SLD>.pem
1.2 Linux
command: "sudo cp <Verzeichnis><SLD>.pem /usr/local/share/ca-certificates/<SLD>.crt"
command: "sudo update-ca-certificates"
1.3 Windows
command: "WIN + R - Eingabe: certmgr.msc" - OK
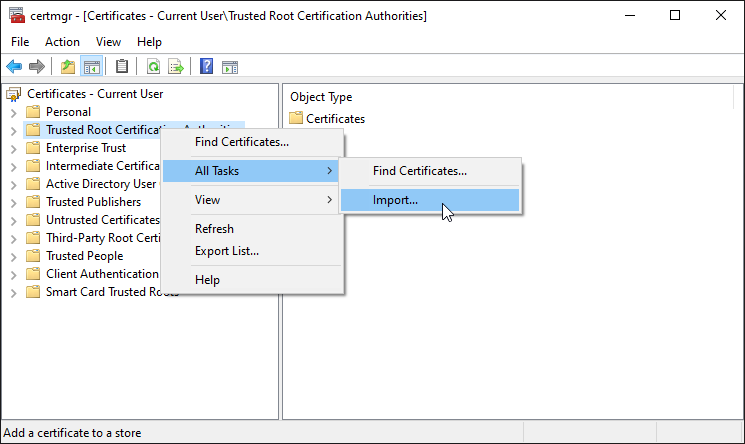
NEXT

hope you can "click together" the rest yourself ! 😎
2. Web Server Certificate
2.1 Apache
Please make sure that you have activated "a2enmod ssl"!
-
- go to the Apache directory "sites-available" and create a .conf file (of course you can also use the default-ssl.conf). If you are running the web server with XAMPP, then:
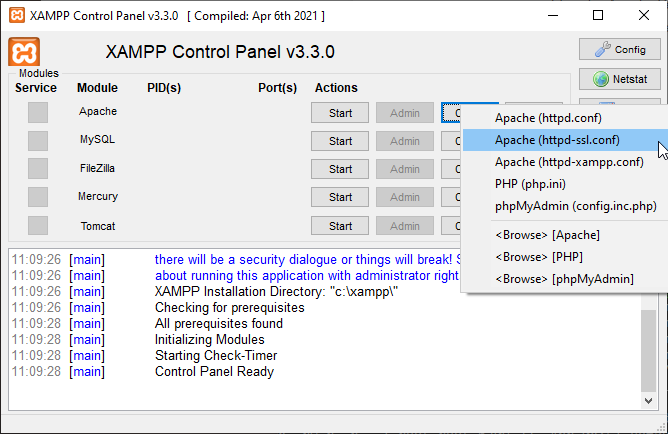
-
- changes the VirtualHost directive
<VirtualHost *:443>
   ServerName <>
   DocumentRoot <>

   SSLEngine on
   SSLCertificateFile <Verzeichnis>/<subdomäne.SLD.TLD>.crt
   SSLCertificateKeyFile <Verzeichnis>/<subdomäne.SLD.TLD>.key
</VirtualHost>-
- command: "a2ensite <der Dateiname>.conf"
- command: "service apache2 restart"
in the case of XAMPP, stop and restart Apache!
2.1 NGINX
server {
    listen              443 ssl;
    server_name         <subdomäne.SLD.TLS>;
    ssl_certificate     <Verzeichnis><subdomäne.SLD.TLS>.crt;
    ssl_certificate_key <Verzeichnis><subdomäne.SLD.TLS>.key;
    ssl_protocols       TLSv1.2 TLSv1.3;
    ssl_ciphers         HIGH:!aNULL:!MD5;
    ...
}
But now you've done it!!!! 😁 Please understand that this is about local certificates and not how to generate a PI or how to set up a web server or, or, or, or... The only thing left to complete the picture is the actual side issue of DNS resolvers. Even if everything has been done correctly, it can happen that your domain is not accessible in your browsers.... 😰 So here's a final chapter DNS Resolver! Hey, and of course a "Gutzi" for hanging in there. Have a look at "Gutzi" !!!!! 😎
DNS Resolver
To really and fully utilize your SSL environment you need a local DNS resolver that knows your home network...
There are various ways to successfully implement this technology (DNS), even with "in-house knowledge".
1. hosts File
You can define your devices in a hosts file and, for example, distribute this manually to all hosts files of the affected devices. However, this can quickly turn into time-consuming work and is prone to errors! Furthermore, there are devices (e.g. IOT, network devices, TVs) that do not offer manual hosts management at all.
2. Resolver
The standard tools such as bind9, dnsmasq could be considered here. However, availability is questionable depending on the operating system. In addition, "failure" is usually pre-programmed, as the technology and tools should be, let's say, semi-professional.
3. Hybrid Applications
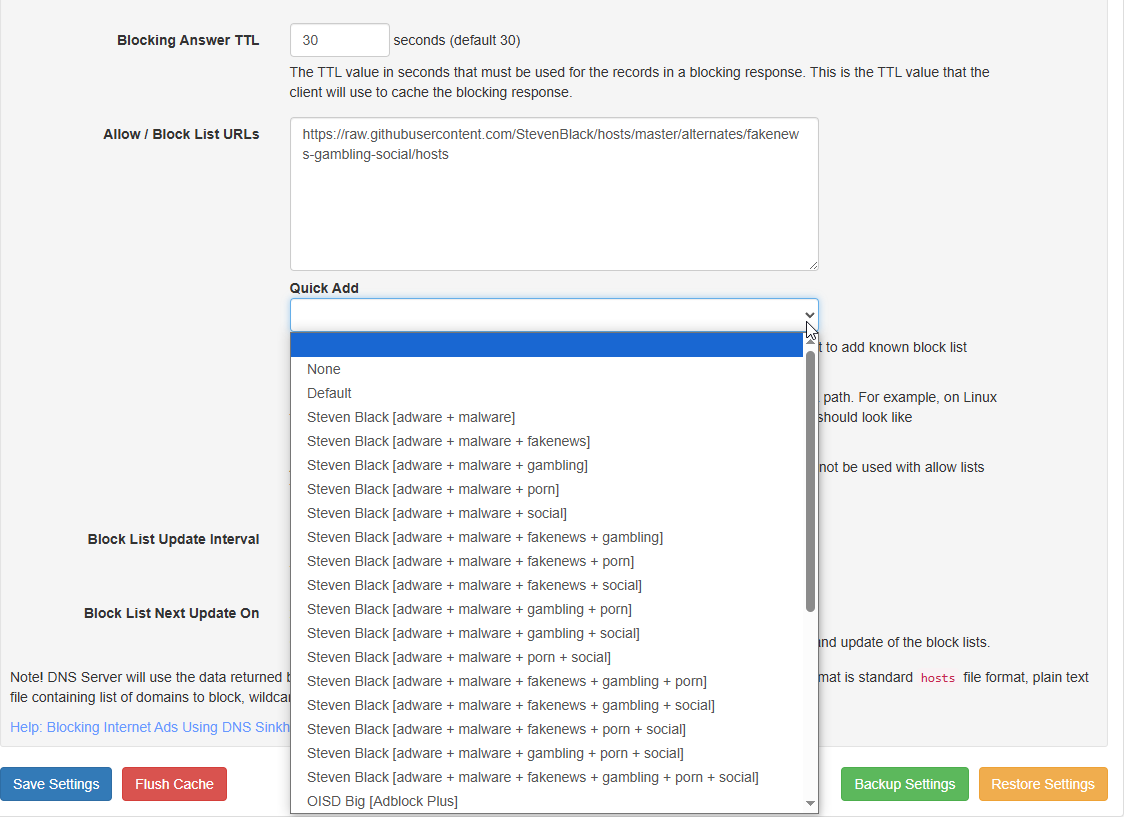
The best-known tools here are PI-Hole and AdGuard. Please keep in mind that these tools were created for a different reason: Ad Blocker!!!!!! Due to the concept (foundation, structure), it is becoming increasingly difficult for the tools to follow modern DNS concepts, i.e. to implement the technologies (e.g. DNSSEC) with all possible methods (e.g. DNS-over-HTTPS or DNS-over-QUIC).
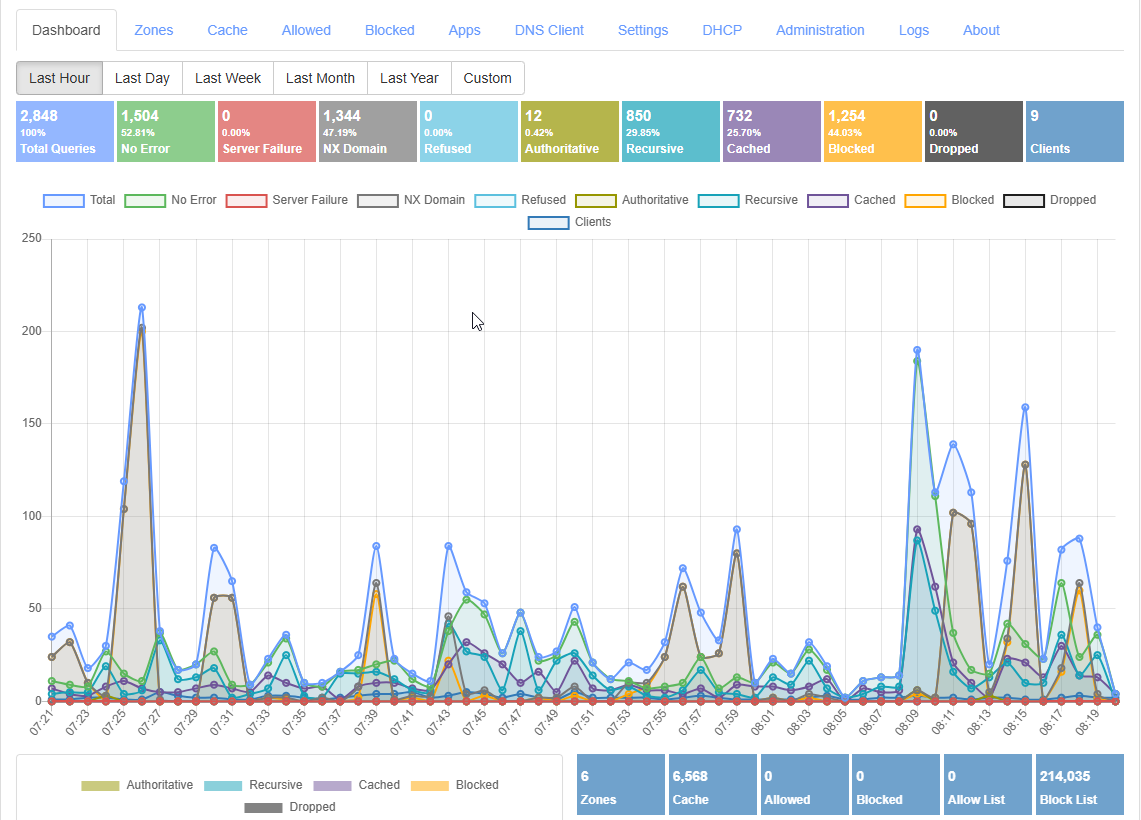
A currently less well-known but all the more remarkable application is Technitium. It combines all the "home computer scientist" requirements of a modern, customizable, sustainable DNS resolver solution. It can provide ad blocking with flexibility and customizability, a really easy to set up and maintain resolver implementation and, if desired, an extensive analysis and reporting environment. Hm, the only disadvantage could be the application language: English. However, this is very technical and English is always better than any botched German translations. The linked video is also very helpful!!!!!
Dashboard
DNS Resolver

Ad Blocking
my recommendation: Technitium
Gutzi
Depending on the size of your home network, the "Create certificates" steps have to be carried out continuously, which can be annoying. Especially if you want to decide on a new domain name after some time... There are also devices, e.g. AVM routers or apps (e.g. Plex) that only accept a .pfx (PKCS#12 standard)! Hm, and we're already out of luck 😤 ...
1. all in one step, oups ...script
For all those who have implemented the realization as recommended by me on a PI or Linux device, here is a script that is quickly adapted and then takes your domain as a parameter and automatically creates all the necessary files.
8-tung! The root certificate must exist / have already been created! and be located in the same directory as the script.
#!/bin/bash

#Required
domain=$1
commonname=$domain

#Change to your company details
country=<>
state=<>
locality=<>
organization=<>
organizationalunit=<>
email=<>

if [ -z "$domain" ]
then
    echo "Argument not present."
    echo "Useage $0 [common name]"

    exit 99
fi

echo "1. generating .key for $domain"
#generate a .key
openssl genrsa -out $domain.key 2048
echo "successful!"
echo ""

echo "2. generating .csr for $domain"
#generate a .csr
openssl req -new -key $domain.key -out $domain.csr \
    -subj "/C=$country/ST=$state/L=$locality/O=$organization/OU=$organizationalunit/CN=$commonname/emailAddress=$email"
echo "successful!"
echo ""


echo "3. generating .ext for $domain"
cat > $domain.ext <<EOF
authorityKeyIdentifier=keyid,issuer
basicConstraints=CA:FALSE
keyUsage = digitalSignature, nonRepudiation, keyEncipherment, dataEncipherment
subjectAltName = @alt_names

[alt_names]
DNS.1 = $domain

EOF
echo "successful!"
echo ""

echo "4. creating .csr for $domain"
openssl x509 -req -in $domain.csr -CA <SLD>.pem -CAkey <SLD>.key -CAcreateserial -out $domain.crt -days 3650 -sha256 -extfile $domain.ext
echo "successful!"
echo ""

echo "5. creating .pem for $domain"
cat $domain.crt $domain.key > $domain.pem
echo "successful!"
echo ""

echo "6. creating .pfx for $domain"
openssl pkcs12 -export -in $domain.pem -out $domain.pfx
echo "successful!"
echo ""
echo "---------------------------"
echo "-------- All Set! ---------"
echo "---------------------------"
echo
- You can download the script here: genCert.zip
- and adapt it to your needs (search for <> and <SLD>. Then save it.
- make the script executable with the command: "sudo chmod +x <scriptname>.sh"
DONE!
Execute with command: "./<sriptname>.sh <subDomäne.SLD.TLD>" 🤗